使用 utterances 作为博客评论组件

前言
之前 BruceIT 用的评论系统是畅言,是搜狐维护的。之所以不考虑继续使用是因为其插件的交互 Bug 较多和未来商业化(比如插入广告等,搜狐总是需要赚钱的 😁)和稳定性。故放弃之,然后选择使用 GitHub Issue 的方式来存储评论。
当然,这样的缺点也是明显的,功能单一,无法对评论进行过滤和筛选,想要评论的人还必须注册一个 GitHub 的账号。
对比了两个目前比较流行的 Comments Widget ,一个是 gitalk ,另外一个就是本文的主角 utterance
用法介绍
使用 utterance 上手非常简单,可以说没有额外的开发工作了。
接下来介绍两种用法:基础用法和 Vue.js 的组件集成
基础用法:直接将代码放置到我们需要的位置
对于第一点的做法,就是我们平常直接使用的做法。
首先创建一个 GitHub 公开仓库 ,然后安装 utterances app 。
然后访问 utteranc 引导页面 进行配置。
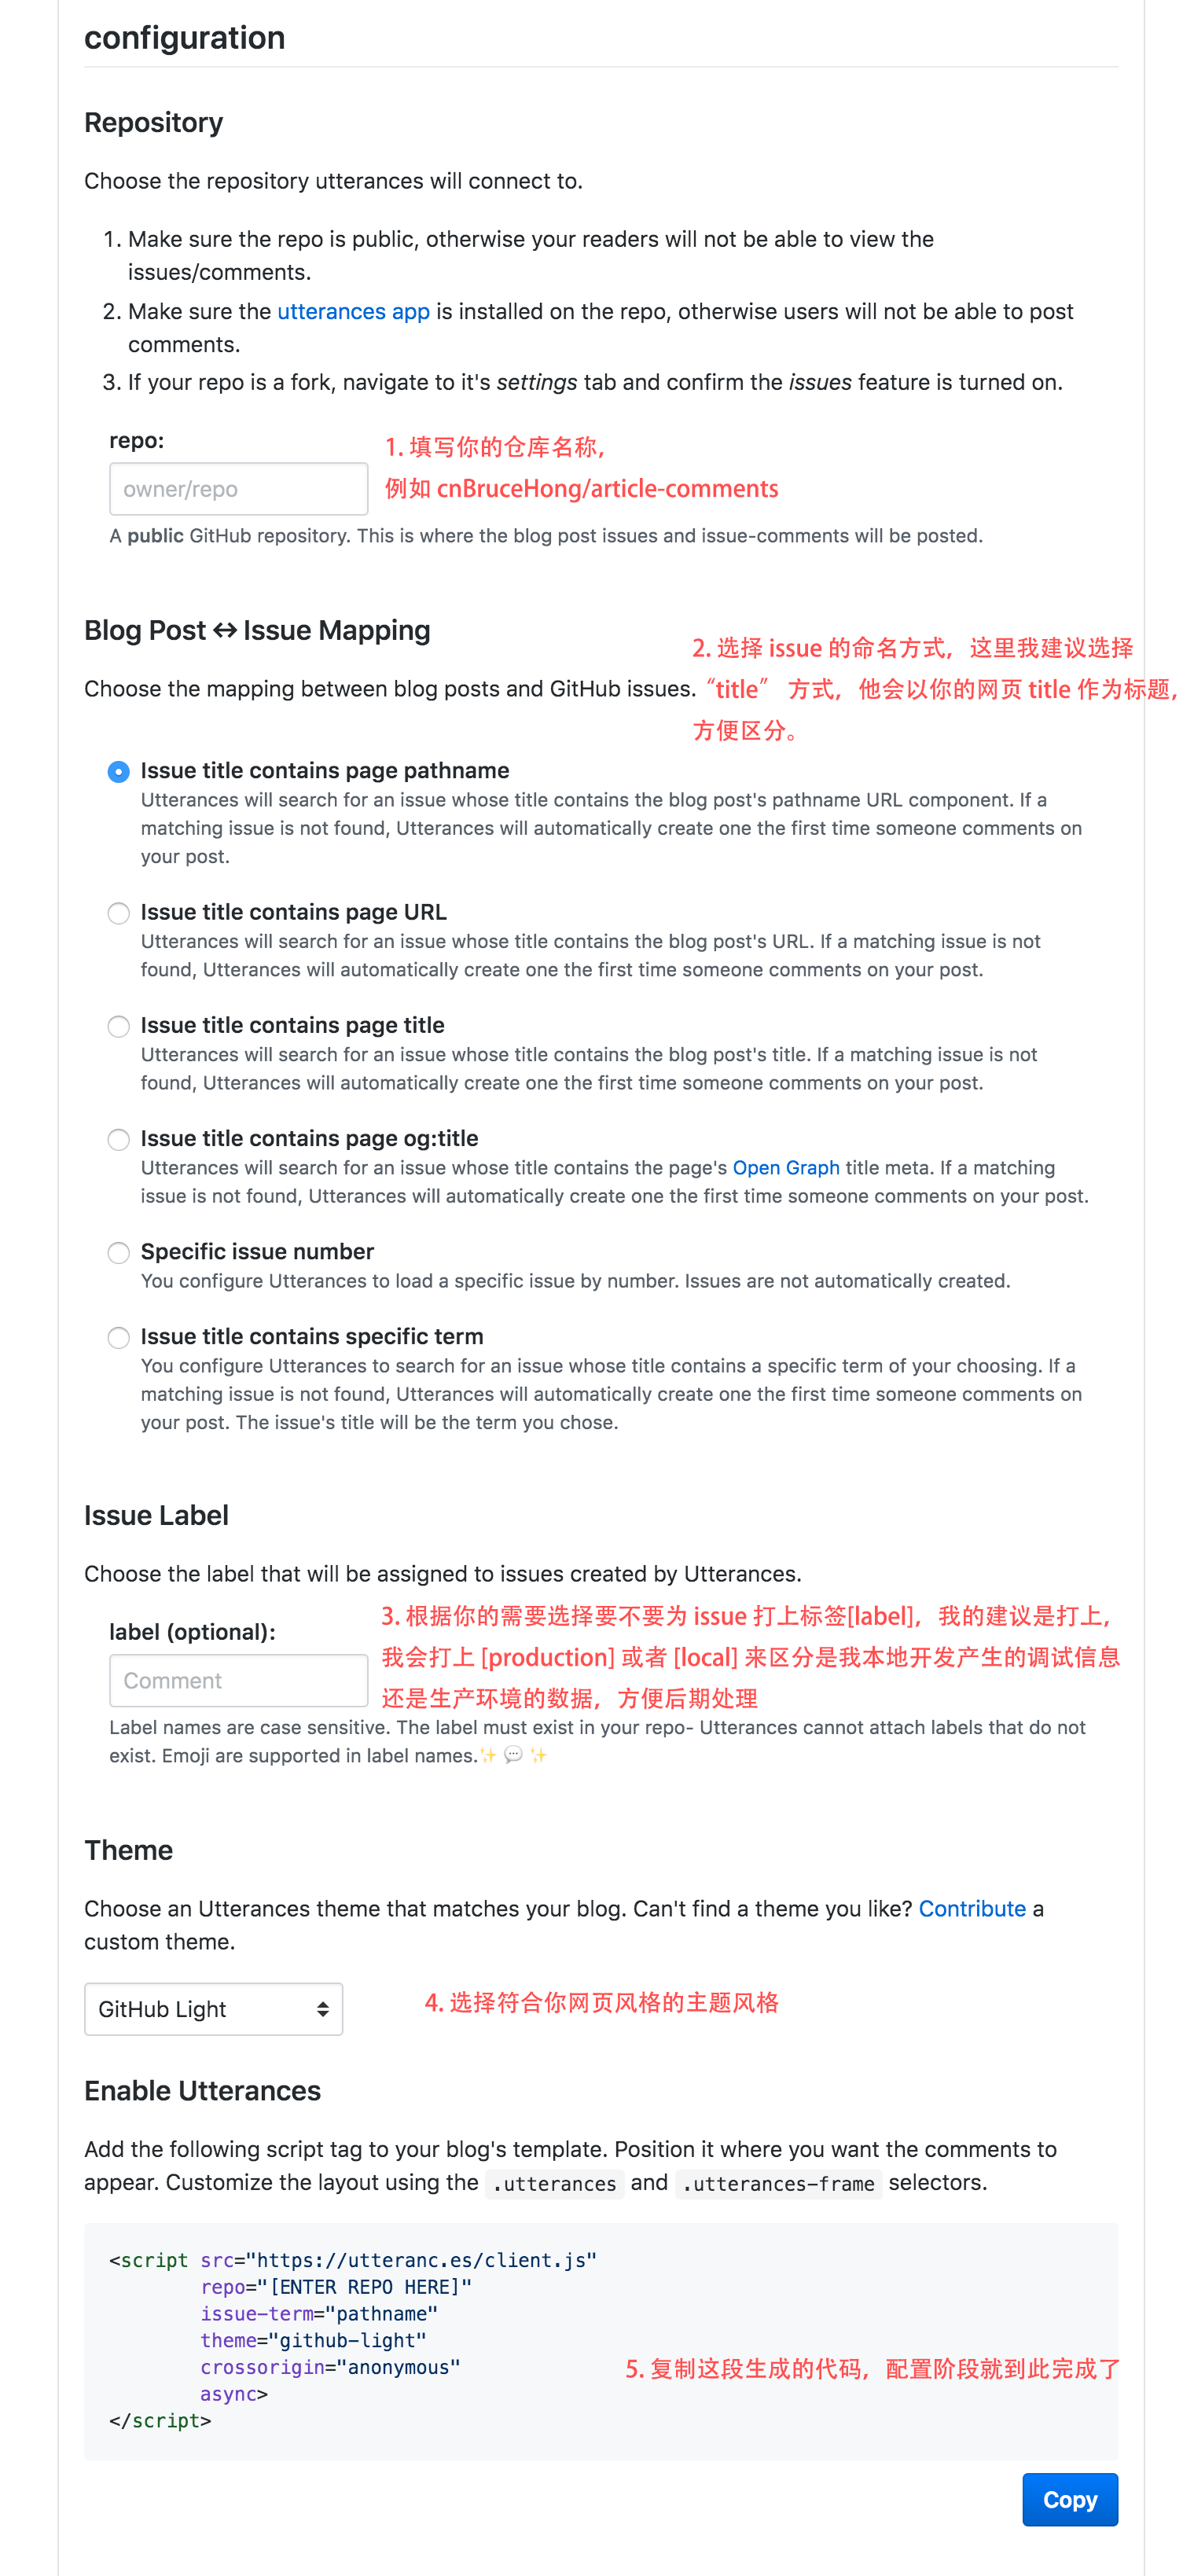
最后将复制好的代码,放到你需要展示的地方。
<!doctype html>
<html lang="zh-CN">
<head>
    <meta charset="UTF-8">
    <meta name="viewport"
          content="width=device-width, user-scalable=no, initial-scale=1.0, maximum-scale=1.0, minimum-scale=1.0">
    <meta http-equiv="X-UA-Compatible" content="ie=edge">
    <title>Demo</title>
</head>
<body>
    <script src="https://utteranc.es/client.js"
            repo="cnBruceHong/articles-comments"
            issue-term="title"
            theme="github-light"
            crossorigin="anonymous"
            async>
    </script>
</body>
</html>
紧接你就能看到评论组件的效果了
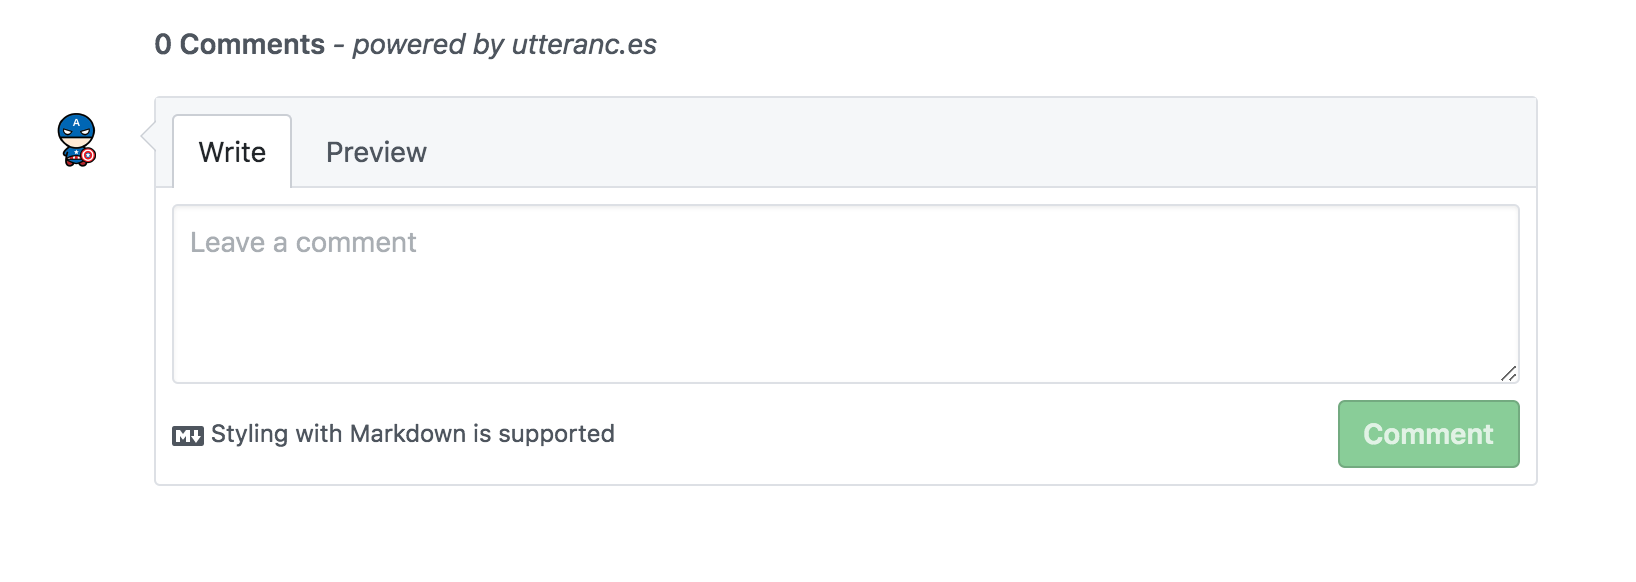
看起来非常简单并且也挺间接优雅好看。🤣
集成 Vuejs 使用:通过编写 Comment 组件实现
首先,我们先来看看基本用法中,那一段 JavaScript 脚本为我们做了什么事情。
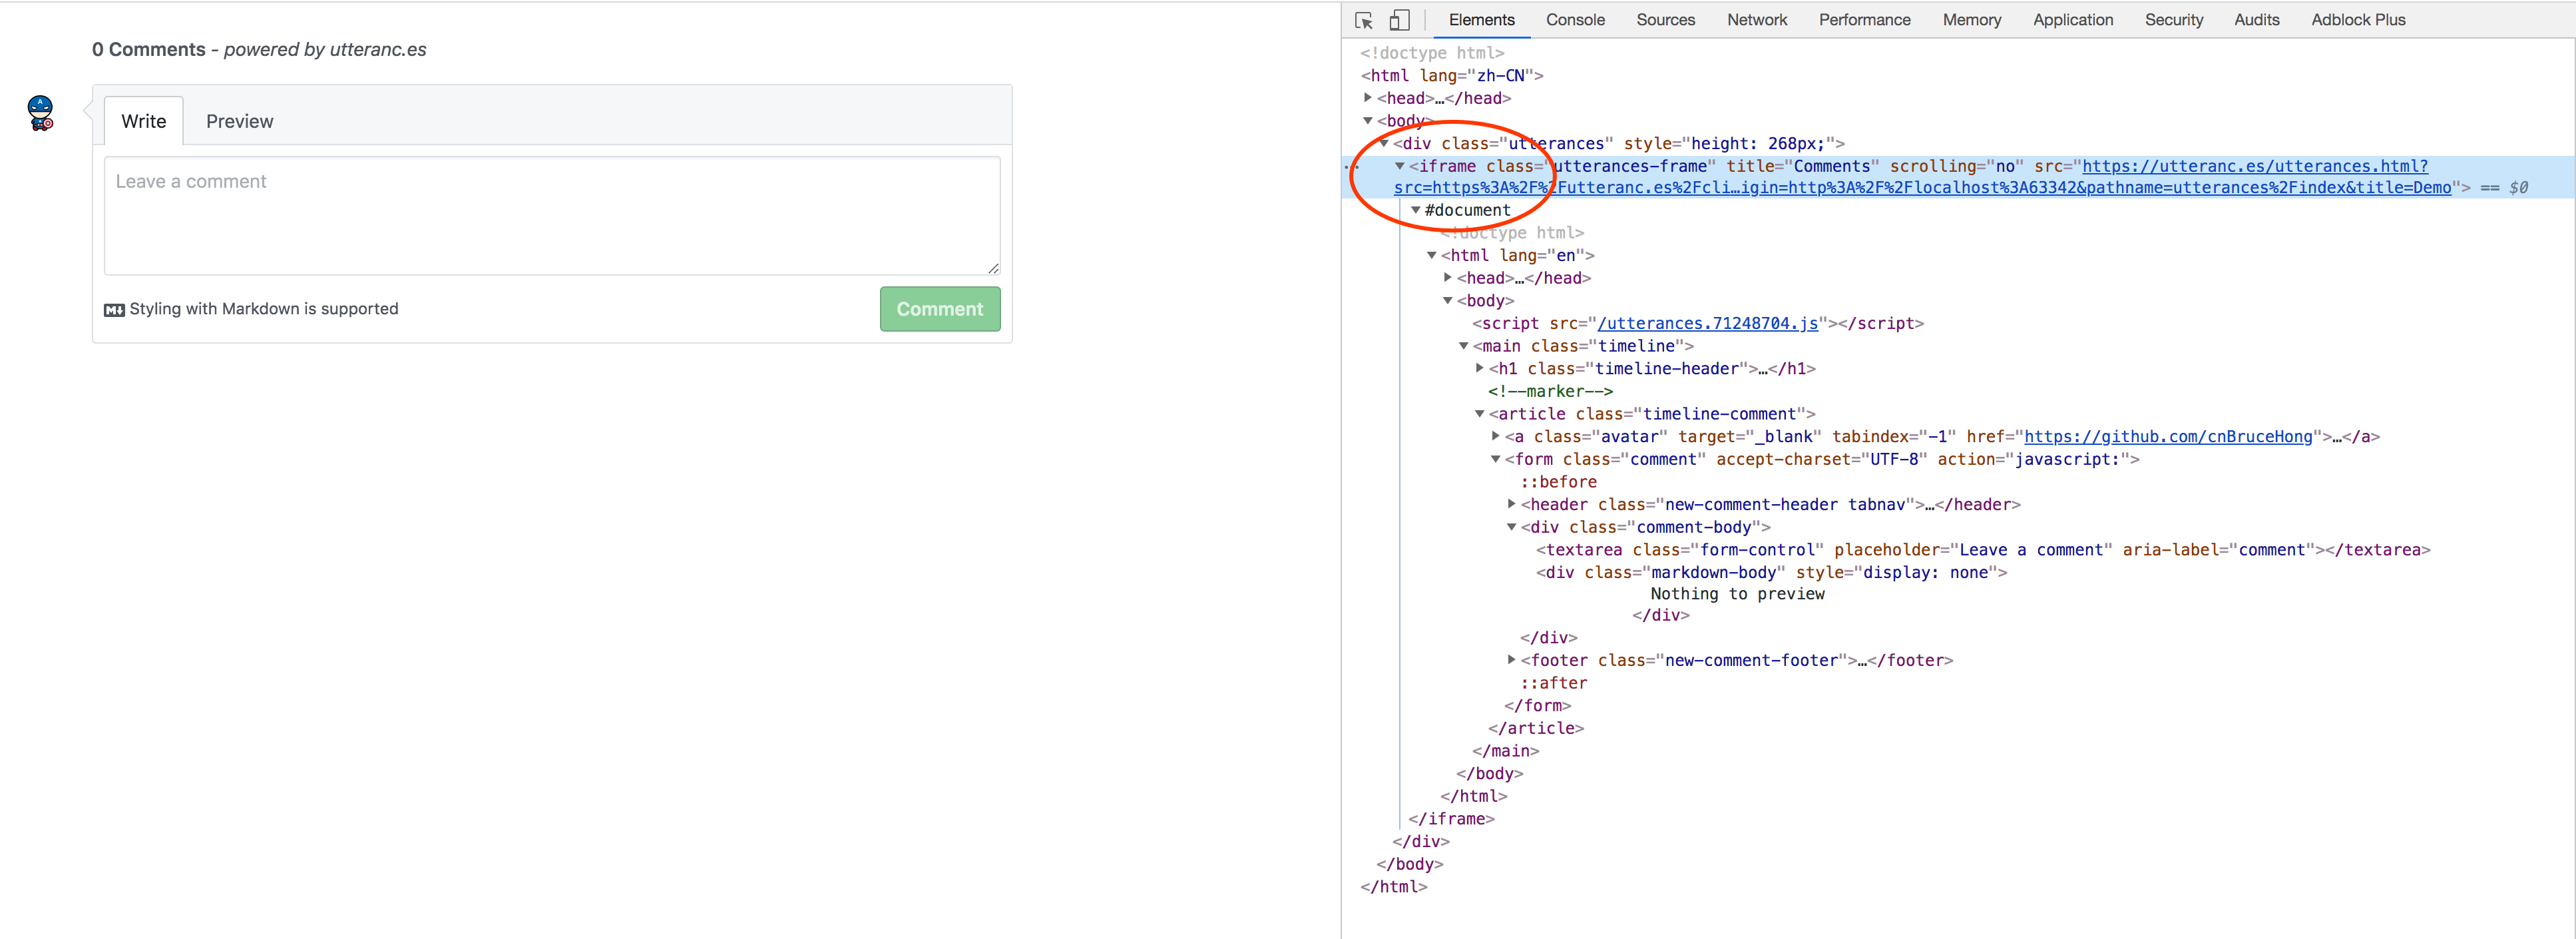
可以看到的是,这段脚本引入了 client.js 脚本,为我们生成了一个 <iframe> 标签。
因此,我们只要在 Vue Component 文件编写这个 template 即可。
创建 comment.vue 文件并编写以下代码
<style lang="scss">

    .utterances {
        position: relative;
        box-sizing: border-box;
        width: 100%;
        max-width: 760px;
        margin-left: auto;
        margin-right: auto;
    }

    .utterances-frame {
        position: absolute;
        left: 0;
        right: 0;
        width: 1px;
        min-width: 100%;
        max-width: 100%;
        height: 100%;
        border: 0;
    }

</style>

<template>
    <div id="comment" class="utterances" :style="{height: height}">
        <iframe class="utterances-frame"
                title="BruceIT评论系统"
                scrolling="no"
                allowtransparency="true"
                :src="page"
        />
    </div>
</template>

<script>
    export default {
        props: [
            "title",
            "description",
            "label",
        ],
        data() {
            return {
                url: window.location.href,
                origin: window.location.origin,
                pathname: window.location.pathname,
                repo: "cnBruceHong/articles-comments",
                issue_term: "title",
                theme: "github-light",
                cross_origin: "anonymous",
                page: "",
                height: 0 + "px"
            }
        },
        created() {
            let api = "https://utteranc.es/utterances.html?src=https://utteranc.es/client.js";
            this.page = api + "&repo=" + this.repo + "&issue-term=" + this.issue_term + "&theme=" + this.theme
                + "&crossorigin=" + this.cross_origin + "&url=" + this.url + "&origin=" + this.origin
                + "&pathname=" + this.pathname + "&title=" + this.title
                + "&description=" + this.description + "&label=" + this.label;
            window.addEventListener('message', (e) => {
                const data = e.data;
                if (data && data.type === 'resize' && data.height) {
                    this.height = data.height + "px";
                }
            });
        },
    };

</script>
然后在你的 app.js 中引入该组件
import Vue from 'vue';
import myComment from 'comment.vue';

new Vue({
    el: '#main',
    components: {
        myComment,
    },
});
然后在你的 html 页面中使用
<!doctype html>
<html lang="zh-CN">
<head>
    <meta charset="UTF-8">
    <meta name="viewport"
          content="width=device-width, user-scalable=no, initial-scale=1.0, maximum-scale=1.0, minimum-scale=1.0">
    <meta http-equiv="X-UA-Compatible" content="ie=edge">
    <title>Demo</title>
</head>
<body>
<div id="main">
    <my-comment
            label="标签"
            title="你的文章标题"
            description="你的文章描述">
        />
</div>
</body>
</html>
这样,我们就完成了这个组件的编写。以后在你需要用到的地方只要编写 <my-comment/> 就可以啦,复用性提高了有木有?😁
总结
本文介绍了两种方法,希望大家看完可以选择合适的方案接入,享受 utterances 带来的功能。